Jenkins + AWS CodeDeploy + Auto Scaling: A Complete CI/CD Pipeline Guide
Step-by-step guide to building a CI/CD pipeline with Jenkins, AWS CodeDeploy, and Auto Scaling — covering in-place and blue/green deployments, AppSpec configuration, and lifecycle hooks.
JenkinsAWSCodeDeployAutoScalingCI/CD蓝绿部署DevOps
1566 Words
2018-11-20
This article walks through setting up a continuous delivery pipeline using Jenkins, AWS CodeDeploy, S3, and Auto Scaling. It covers everything from creating Auto Scaling groups to configuring blue/green deployments with lifecycle hooks.
AWS Auto Scaling
Benefits of Auto Scaling
- Consistent infrastructure — Every instance launches with the same software stack (Nginx, PHP, etc.), eliminating configuration drift.
- Rapid scaling — Simply set the desired instance count in your Auto Scaling group and new instances spin up automatically.
- Policy-driven scaling — Define scaling policies based on metrics like CPU utilization to add or remove instances automatically.
- Cost control — Use smaller instances that scale horizontally, which is the whole point of Auto Scaling.
Auto Scaling Components
Auto Scaling Group: A logical grouping of EC2 instances used for scaling and management. When creating a group, you specify the minimum, maximum, and desired number of instances.
Launch Configuration: A template that defines how EC2 instances are launched — including instance type, key pair, security groups, and storage.
Setting Up the Launch Configuration
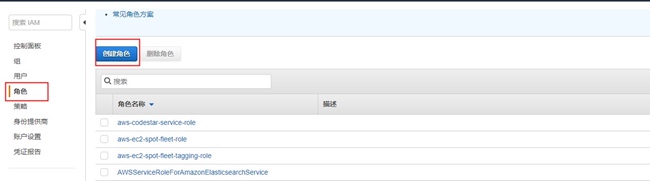
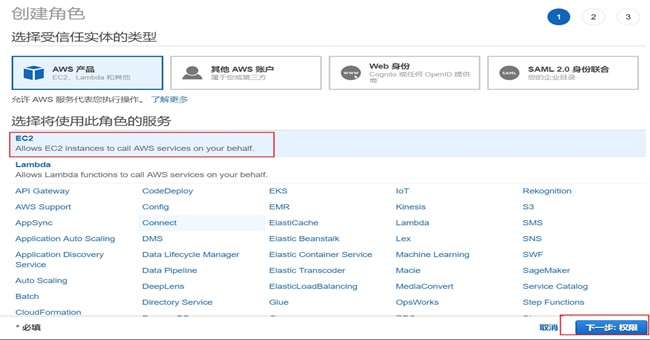
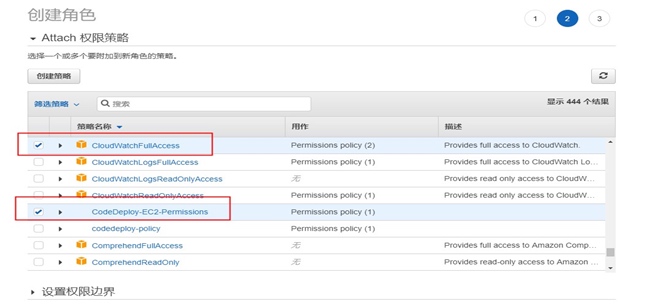
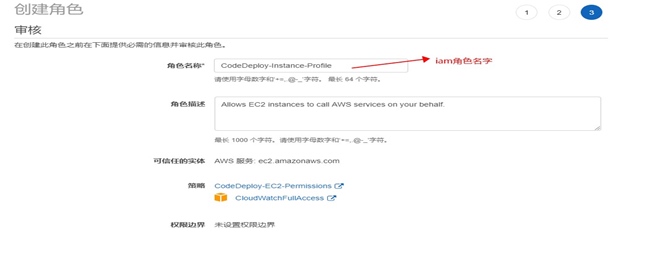
Step 1: Create an IAM Role for EC2 Instances
Navigate to https://console.aws.amazon.com/iam/ and create a role with the necessary permissions for CodeDeploy and S3 access.
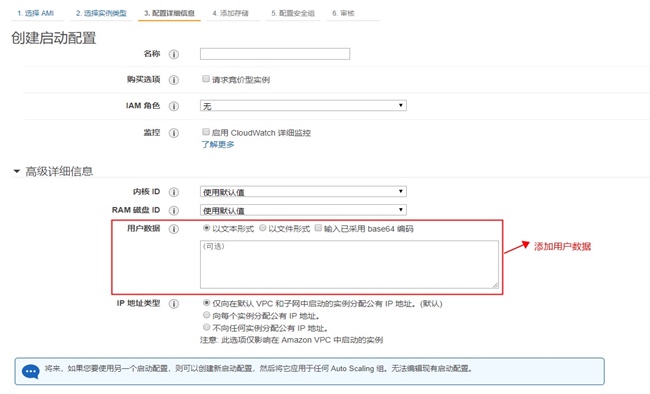
Step 2: Create the Launch Configuration

Step 3: Add User Data for Instance Bootstrap
The user data script runs when each instance launches, installing all required software (CodeDeploy agent, Nginx, PHP) and starting Supervisor to manage the processes:
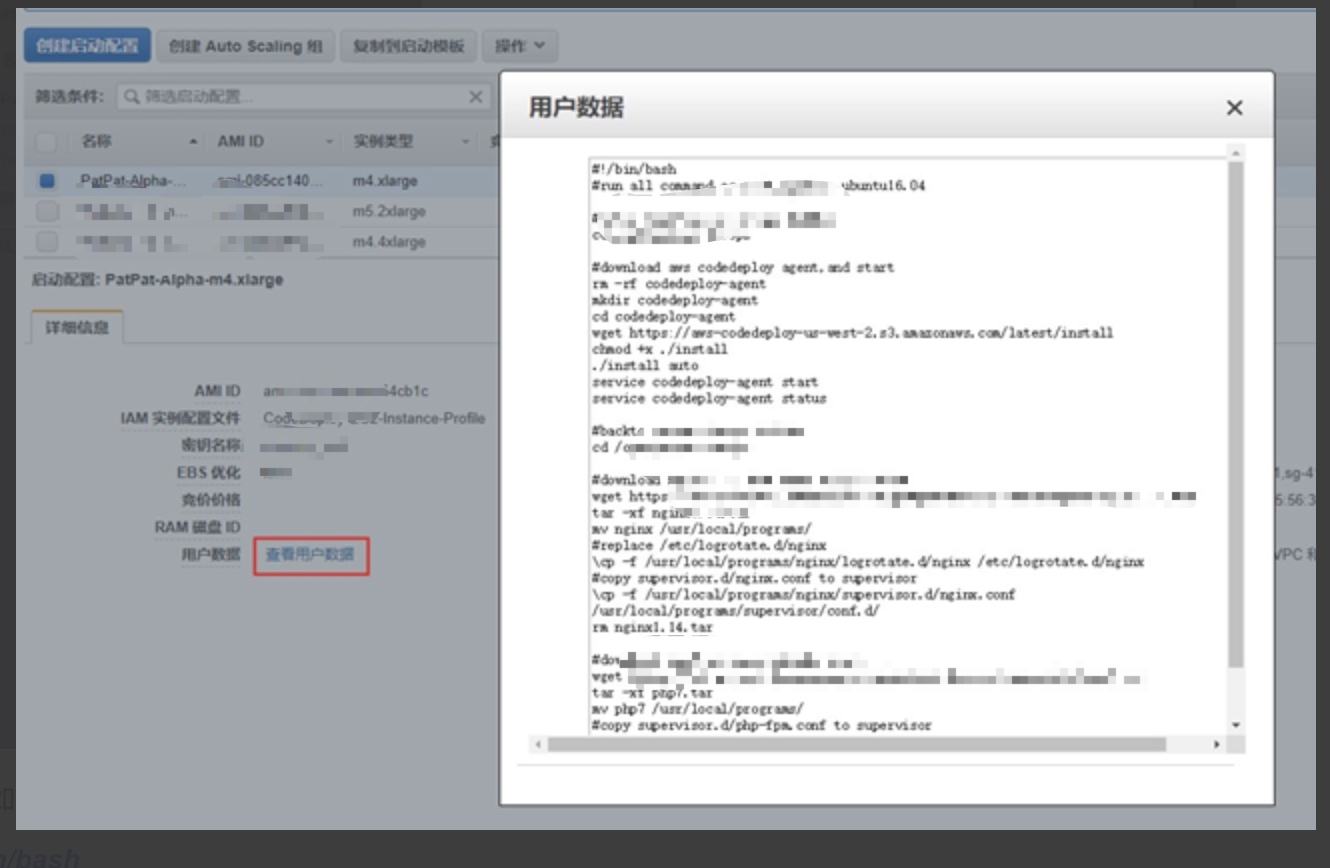
#!/bin/bash
# Run as root on Ubuntu 16.04

cd /opt/patpat-devops

# Install and start CodeDeploy agent
rm -rf codedeploy-agent
mkdir codedeploy-agent
cd codedeploy-agent
wget https://xxxx.com/latest/install
chmod +x ./install
./install auto
service codedeploy-agent start
service codedeploy-agent status

cd /opt/patpat-devops

# Install Nginx
wget https://xxxx.com/nginx/nginx1.14.tar
tar -xf nginx1.14.tar
mv nginx /usr/local/programs/
\cp -f /usr/local/programs/nginx/logrotate.d/nginx /etc/logrotate.d/nginx
\cp -f /usr/local/programs/nginx/supervisor.d/nginx.conf /usr/local/programs/supervisor/conf.d/
rm nginx1.14.tar

# Install PHP 7
wget https://xxxx.com/php/php7.tar
tar -xf php7.tar
mv php7 /usr/local/programs/
\cp -f /usr/local/programs/php7/etc/supervisor.d/php-fpm.conf /usr/local/programs/supervisor/conf.d/
rm php7.tar

# Start or reload Supervisor
isExistApp=$(pgrep supervisor)
if [ -n "$isExistApp" ]; then
    echo "Supervisor is running, reloading..."
    /usr/local/bin/supervisorctl reload
else
    echo "Starting Supervisor..."
    /usr/local/bin/supervisord -c /usr/local/programs/supervisor/supervisord.conf
fi

chmod -R 777 /usr/local/programs/nginx/logs
echo "Install finished!"
This user data is added in the “Configure Details” tab when creating the launch configuration:
Step 4: Create the Auto Scaling Group
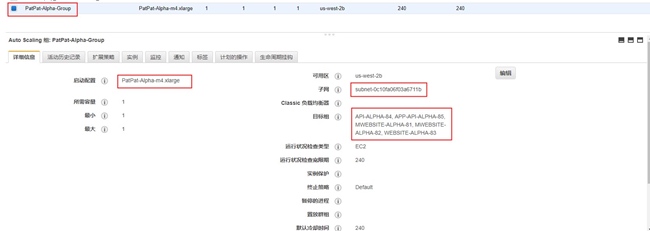
Attach the Auto Scaling group to an Elastic Load Balancer for traffic distribution:
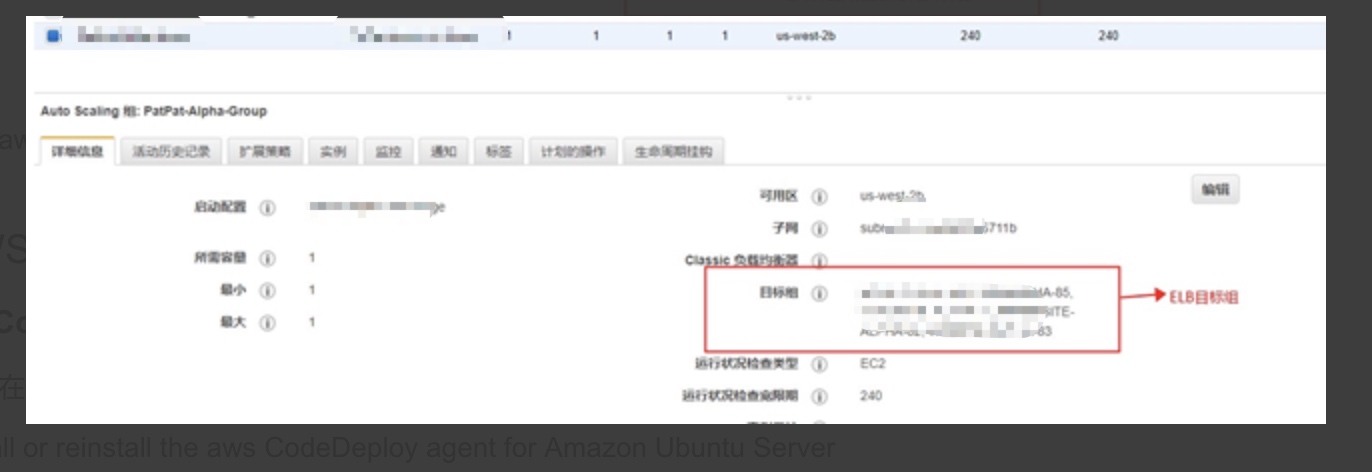
Once created, Auto Scaling immediately launches the desired number of EC2 instances.
AWS CodeDeploy
Prerequisites
The CodeDeploy agent must be installed on every EC2 instance. You can either bake it into your AMI or install it via user data (as shown above).
To install the agent manually on Ubuntu:
sudo apt-get install ruby
sudo apt-get install wget
cd /home/ubuntu
wget https://bucket-name.s3.amazonaws.com/latest/install
chmod +x ./install
sudo ./install auto
sudo service codedeploy-agent status
sudo service codedeploy-agent start
Replace
bucket-namewith the appropriate S3 bucket for your region (e.g.,aws-codedeploy-us-east-2for US East Ohio).
CodeDeploy Core Concepts
- Deployment: Deploys a new revision (containing your application and AppSpec file) to a deployment group.
- Application: A container for deployment groups and revisions.
- Revision: A specific version of deployable content (source code, build artifacts, scripts, and the AppSpec file), stored in S3 or GitHub.
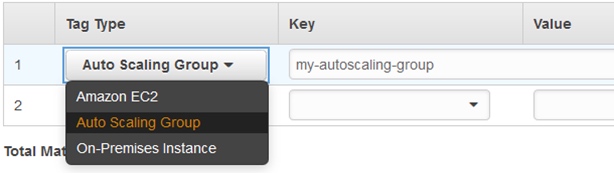
- Deployment Group: A set of EC2 instances targeted for deployment, identified by tags, Auto Scaling group names, or both. You can have multiple deployment groups per application (e.g., staging and production).
- Deployment Configuration: Controls deployment behavior, including how failures are handled. For example, you can require at least 50% of instances to remain healthy during deployment.
Deployment Types
In-Place Deployment
Stops the application on each instance, installs the new revision, then restarts and validates. Instances can be deregistered from a load balancer during deployment and re-registered afterward. This performs a rolling update across the deployment group.
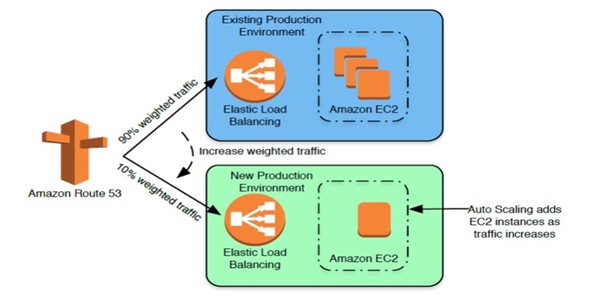
Blue/Green Deployment
Provisions a new set of replacement instances, installs the new application version, then switches traffic from the original (blue) instances to the new (green) instances. This approach offers several advantages:
- Test the new version on fresh instances before sending production traffic.
- Faster rollback — just redirect traffic back to the original instances (as long as they haven’t been terminated).
- Fresh instances avoid configuration drift that can accumulate on long-running servers.
Blue/green deployments require Amazon EC2 instances.
In-Place Deployment Flow
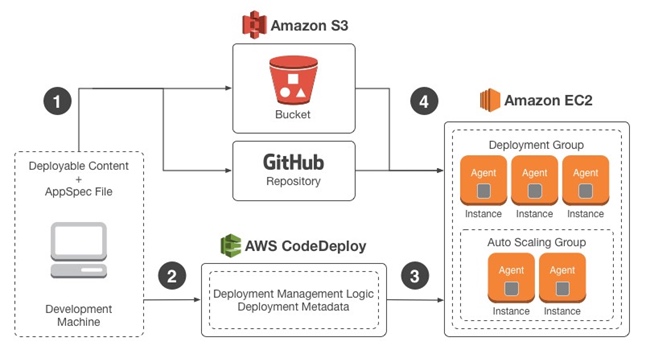
- Bundle your application code with an AppSpec file and upload it to S3 or GitHub as a revision.
- Tell CodeDeploy which S3 bucket/GitHub repo to pull from and which deployment group to target.
- The CodeDeploy agent on each instance polls for new revisions.
- When a new revision is detected, each agent downloads and deploys it according to the AppSpec file.
Blue/Green Deployment Flow
Traffic is rerouted from the original environment to a replacement environment:
- New replacement instances are provisioned.
- The latest revision is deployed to the replacement instances.
- An optional wait period allows for testing and validation.
- Replacement instances are registered with the load balancer; original instances are deregistered.
Reference: https://docs.aws.amazon.com/codedeploy/latest/userguide/welcome.html
The AppSpec File
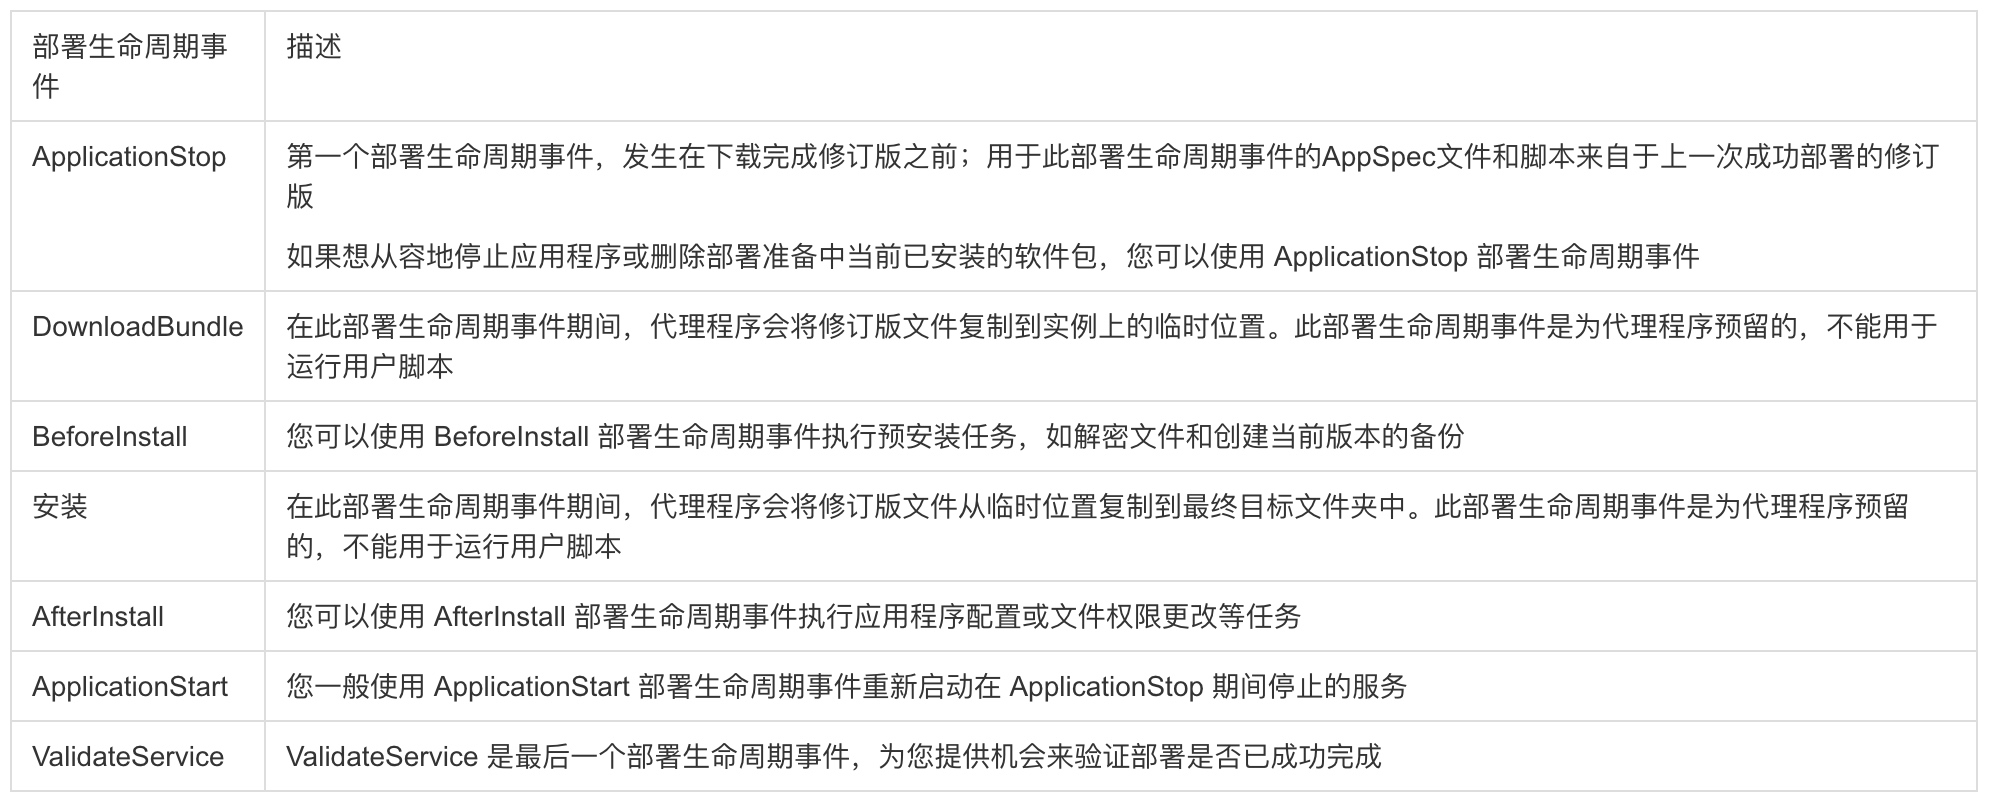
The appspec.yml file is a YAML configuration that tells CodeDeploy what files to copy and what scripts to run during each deployment phase. It must be named exactly appspec.yml and placed in the root of your revision.
Here is a basic example:
version: 0.0
os: linux

files:
  - source: /
    destination: /var/www/html/WordPress

hooks:
  ApplicationStop:
    - location: helper_scripts/stop_server.sh
  BeforeInstall:
    - location: deploy_hooks/puppet-apply-apache.sh
    - location: deploy_hooks/puppet-apply-mysql.sh
  AfterInstall:
    - location: deploy_hooks/change_permissions.sh
      timeout: 30
      runas: root
    - location: helper_scripts/start_server.sh
      timeout: 30
      runas: root
And a production example:
version: 0.0
os: linux

files:
  - source: /
    destination: /var/www/alpha-website_desktop/

hooks:
  BeforeInstall:
    - location: codedeploy-scripts/install_dependencies
      timeout: 300
      runas: root
  AfterInstall:
    - location: codedeploy-scripts/change_applications_configure
    - location: codedeploy-scripts/change_permissions
      timeout: 300
      runas: root
  ApplicationStart:
    - location: codedeploy-scripts/start_server
      timeout: 300
      runas: root
  ApplicationStop:
    - location: codedeploy-scripts/stop_server
      timeout: 300
      runas: root
Deployment Lifecycle Events
Deployments pass through a set of predefined phases called lifecycle events, which let you run custom scripts at each stage.
In-place deployment lifecycle:
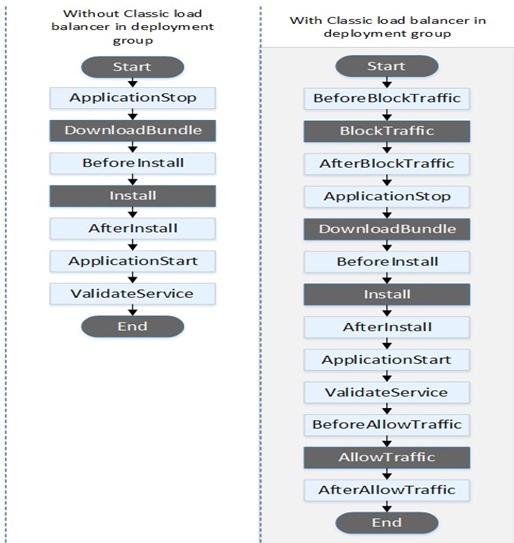
Blue/green deployment lifecycle:
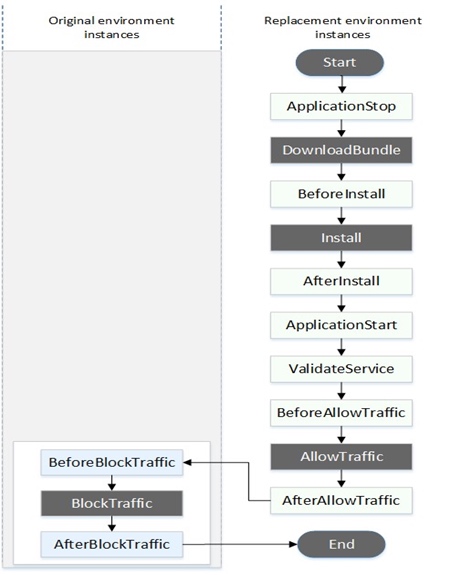
Traffic switching during blue/green deployment:
Reference: https://aws.amazon.com/blogs/devops/under-the-hood-aws-codedeploy-and-auto-scaling-integration/
Integrating CodeDeploy with Auto Scaling
To connect CodeDeploy with Auto Scaling, specify your Auto Scaling group name in the deployment group configuration on the CodeDeploy console:
You also need to:
- Install the CodeDeploy agent on Auto Scaling instances (via AMI or user data).
- Ensure the CodeDeploy service role has proper permissions to interact with Auto Scaling.
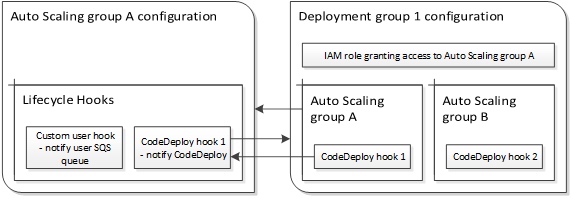
Auto Scaling Lifecycle Hooks
Communication between Auto Scaling and CodeDeploy is based on Auto Scaling lifecycle hooks. CodeDeploy automatically manages these hooks — do not modify them manually.
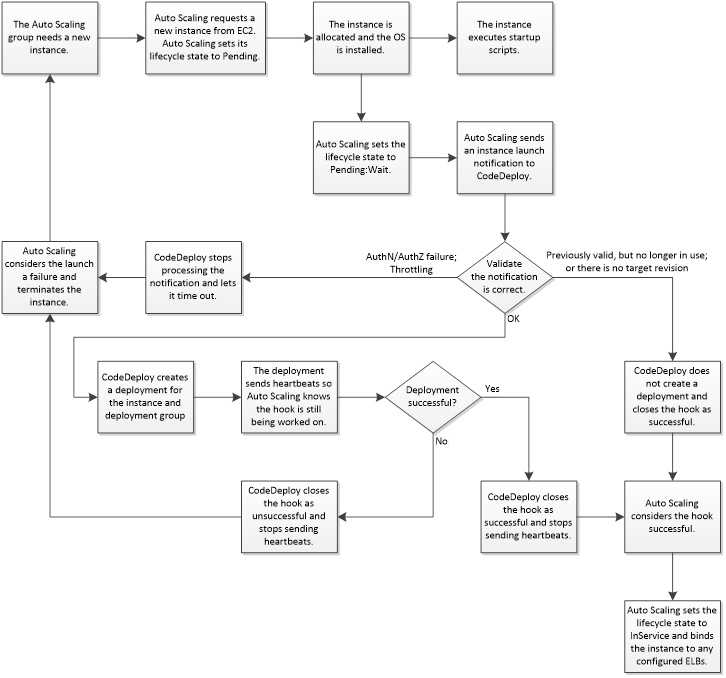
When a new instance launches (scale-out event), here is what happens:
- Auto Scaling requests a new EC2 instance.
- EC2 provisions the instance using the launch configuration.
- Auto Scaling places the instance in
Pending:Waitstate and notifies CodeDeploy. - CodeDeploy receives the notification and validates the configuration.
- CodeDeploy deploys the target revision (the last successfully deployed revision) to the new instance.
- If deployment succeeds, CodeDeploy tells Auto Scaling to
CONTINUE. If it fails, CodeDeploy signalsABANDON, and Auto Scaling terminates the instance.
Best Practices
Do not manually modify lifecycle hooks. CodeDeploy manages them automatically. Misconfigured hooks can break the integration.
Monitor for deployment failures. When a deployment fails on a new instance, CodeDeploy marks it for termination. Auto Scaling replaces it and triggers another deployment. If your revision has a bug, this can create an infinite loop of launching and terminating instances.
Troubleshooting strategy: If deployments keep failing, disassociate the Auto Scaling group from the deployment group first. Then test your deployment on a standalone EC2 instance with the same AMI. Once the scripts work correctly, re-associate the Auto Scaling group.
Control script execution order. The CodeDeploy agent starts looking for deployments immediately on boot. There is no ordering between deployments and other startup scripts (user data, cfn-init). Install the CodeDeploy agent as the last step in your user data, or bake it into the AMI in a stopped state and start it at the end of your bootstrap script.
Avoid multiple deployment groups per Auto Scaling group. Multiple hooks trigger parallel deployments, which cannot be ordered. If any deployment fails, the instance is terminated immediately, causing other running deployments to fail as well.
Jenkins + Git + CodeDeploy Integration
Follow the official AWS tutorial for detailed setup instructions.
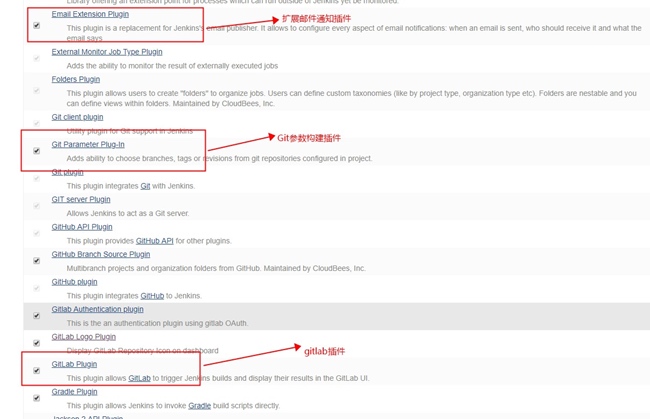
Install the CodeDeploy plugin for Jenkins:
Project Configuration Directory Structure
project-configure/
├── geodata/
│   └── geoip.mmdb
├── company-name/
│   ├── alpha/                          # Alpha environment
│   │   └── project-name/
│   │       ├── codedeploy/
│   │       │   ├── appspec.yml
│   │       │   └── codedeploy-scripts/
│   │       │       ├── change_applications_configure
│   │       │       ├── change_permissions
│   │       │       ├── install_dependencies
│   │       │       ├── start_server
│   │       │       └── stop_server
│   │       ├── project-conf.d/         # Application config (.env files)
│   │       └── server-applications/    # Server software configs (Nginx, PHP)
│   ├── production/                     # Production environment
│   └── test/                           # Test environment
└── README
The directory hierarchy follows the pattern: Platform / Environment / Project
Each project directory contains three subdirectories:
codedeploy/— AppSpec file and deployment scriptsproject-conf.d/— Application configuration files (e.g.,.env)server-applications/— Server software configurations (Nginx, PHP, Kinesis Agent)
Build and Deploy
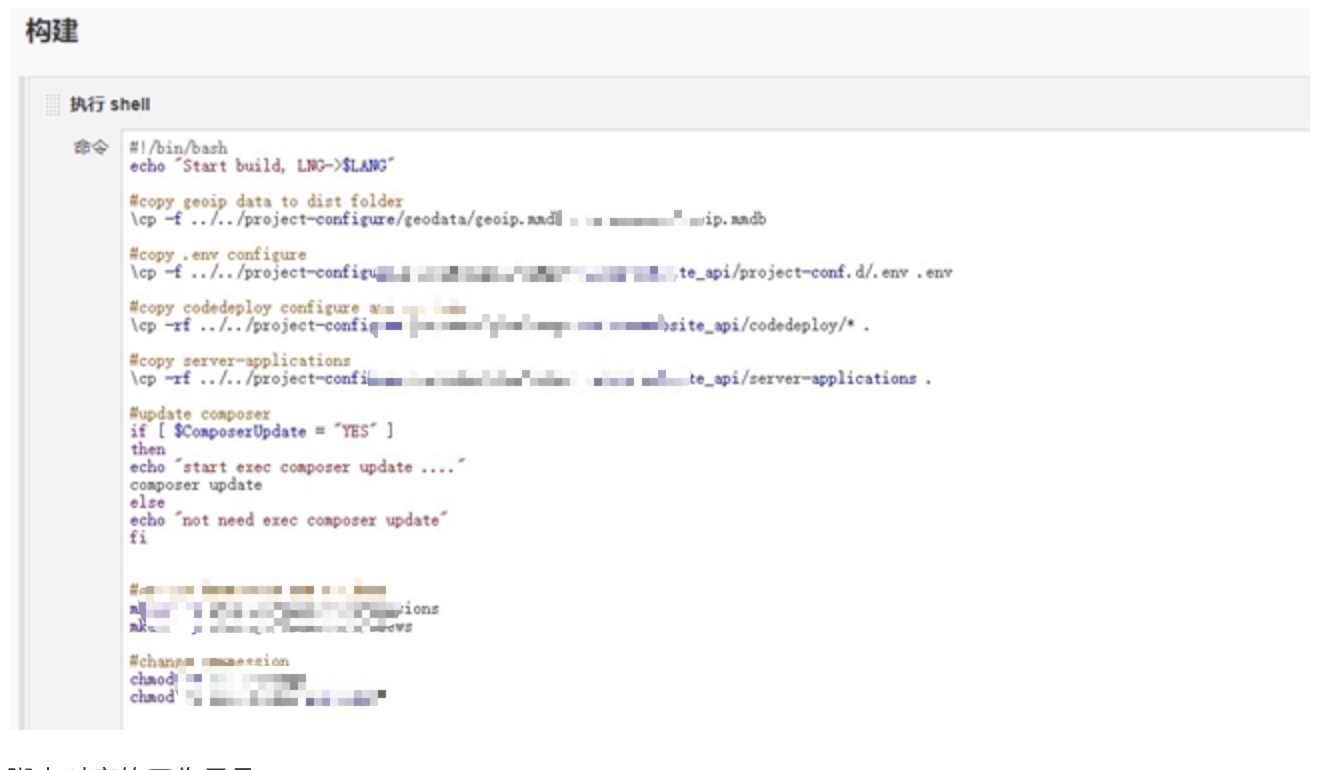
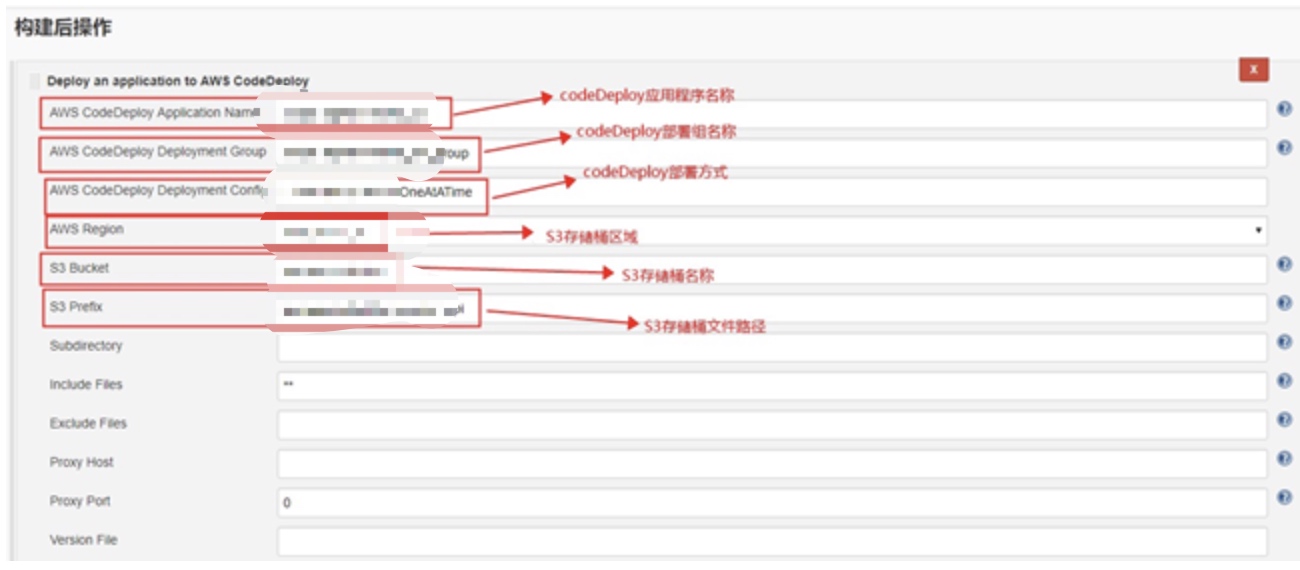
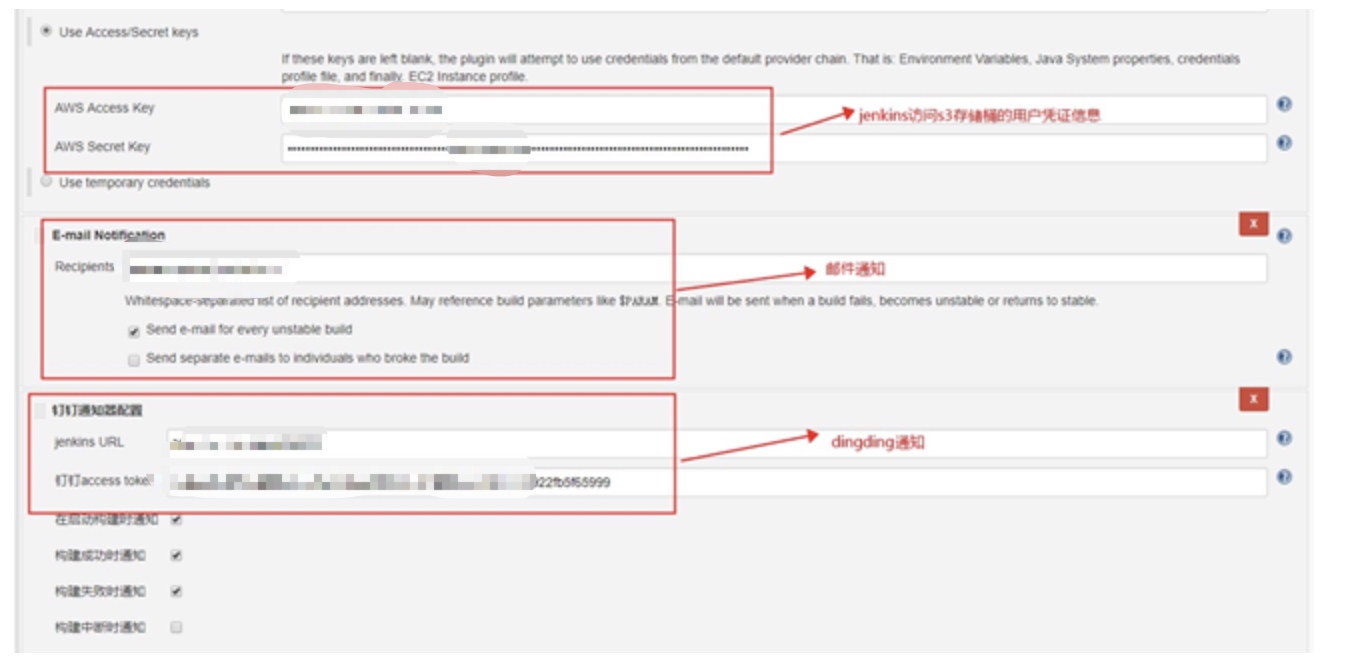
Jenkins uploads the deployment package to the designated S3 bucket:
Deployment Flow
The end-to-end process works as follows:
- Jenkins builds the application and uploads the deployment package to S3.
- The CodeDeploy agent on each EC2 instance polls for new revisions.
- When a new revision is detected in S3, the agent downloads and extracts it.
- CodeDeploy executes the deployment according to the
appspec.ymlfile. - All instances in the same deployment group receive the latest package, ensuring consistency across the fleet.
Comments
Join the discussion — requires a GitHub account